Yesterday, I got some work fixing a PC that was loaded with Trojans. After a repair installation of XP Pro w/SP2, I was brought to the activation window which could not hit the internet.
Thinking the problem was a driver issue, I quickly pulled the Windows key + U trick to pull up an explorer window. Finding the drivers were intact, I proceeded to both ping 4.2.2.2 & google.com, as well as nslookup google.com. Both were successful.
I opened an IE window, checked the proxy settings, reset all the settings, etc...still could not browse--was getting the error "Internet Explorer can not open the search page." & a page cannot be displayed error.
Thinking the trojan was still impacting IE, I installed Firefox from a flash drive, and ended up with the same result.
I next attempted to telnet to port 80 & 8080 on a number of web sites. All HTTP traffic was blocked.
After a few more hours of struggling & research, I realized the culprit:
Norton Internet Security Version 2006 (Symantec).
A run of the Norton Removal Tool (http://service1.symantec.com/Support/tsgeninfo.nsf/docid/2005033108162039) & reboot, and the issue was resolved.
Tuesday, December 1, 2009
Thursday, November 26, 2009
Terminal Services Event ID 6037
I recently struggled with this one for work, after I made a change to IIS on our terminal server (Server 2008 Standard). I could not launch TS RemoteApps, as credentials were being consistently rejected, though correct. The only error I could find in the event log was along these lines:
Log Name: System
Source: LsaSrv
Date: 10/27/2008 10:46:40 PM
Event ID: 6037
Task Category: None
Level: Warning
Keywords: Classic
User: N/A
Computer: Gateway
Description:
The program lsass.exe, with the assigned process ID 572, could not authenticate locally by using the target name TERMSERV/ts.xxxx.com. The target name used is not valid. A target name should refer to one of the local computer names, for example, the DNS host name.
This error may also contain address "HTTP/ts.xxxx.com"
Thanks to Chad A. Gross on the http://www.vistax64.com forums, I was pointed at a blog with a solution: http://blogs.technet.com/sbs/archive/2009/05/07/event-2436-for-sharepoint-services-3-search.aspx.
Though the blog states a solution for a different problem, it worked just as well for me:
Click Start, click Run, type regedit, and then click OK.
In Registry Editor, locate and then click the following registry key:
HKEY_LOCAL_MACHINE\SYSTEM\CurrentControlSet\Control\Lsa\MSV1_0
Right-click MSV1_0, point to New, and then click Multi-String Value.
Type BackConnectionHostNames, and then press ENTER.
Right-click BackConnectionHostNames, and then click Modify.
In the Value data box, type the URL mentioned in the above warning event, and then click OK.
Quit Registry Editor, and then restart the IIS service.
For good measure, I restarted the server and bam, the error was gone.
Monday, October 19, 2009
Installing .TTF Fonts in Slackware 12.2
I was recently working on a project for my boss when I found I needed to install some new fonts for GIMP.
I had downloaded some free TTF's from http://www.1001freefonts.com/ & needed to install them.
Restarting X was a pain, so I found the following steps worked with only restarting GIMP:
1.) Move your fonts into the ~/.fonts folder. Create it if it doesn't exist.
2.) Run command makefontdir
3.) Run command makefontscale
4.) Run command fc-cache
5.) Finally, command xset fp rehash
6.) Restart whatever application you're working with, be it GIMP, OOo, or whatever.
Your font should now be listed!
Thursday, October 1, 2009
Installing (Free) G729 Codec on Trixbox CE
The G.729 codec is a low-bandwidth codec, excellent for use in VoIP.
In this case, a client which my company manages wanted to minimize bandwidth usage from VoIP phones traveling through a VPN. Both the G729 & G723 codec are freely available from here, though you can alawys purchase a copy from Digium.
First download the G729 codec appropriate for your processor & system type. A great way to find this information is to run a cat /proc/cpuinfo and a uname -m command. Search down through the list (ensure you download G729, not G723!) for your appropriate binary. In my case, we were running on a P4 with no ss3, so I stuck with the standard codec_g729ast14-gcc4-glibc-pentium4.so binary.
Now, I'm not sure if this is necessary, but I moved the /usr/lib/asterisk/modules/format_g729.so file out of the /usr/lib/asterisk/modules folder, over to /home/root. I did this to ensure we were starting fresh.
Next, copy the downloaded codec over to that same /usr/asterisk/modules folder. Connect into asterisk console with the command asterisk -r, and load the new codec with module load codec_g729-ast14-gcc4-glibc-pentium4.so, or whatever your codec was.
You would think the phone system would be ready for G729 use, but in my case, I needed to restart asterisk with the command restart gracefully. Ensure everyone is out of the office, as this will drop all live calls!
When asterisk comes back up, log back into asterisk and run the command show translation which should give you some output such as the following:

As long as there’s a # (in this case, 6’s) and not a – under the g729 codec, we know it’s working properly.
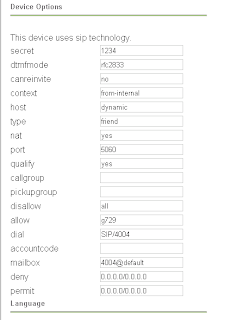
The next step would be to head into the web interface, under PBX->PBX Settings->Extensions, choose the extension you wish to enable the codec for, ensure disallow is set to “all” and allow is set to “g729”.

Once the extension is set up to allow g729, you can test whether it’s working properly by having a test call connected and running the command sip show channels:
trixbox1*CLI> sip show channels
Peer User/ANR Call ID Seq (Tx/Rx) Format Hold Last Message
10.100.253.91 4004 2e1225e1-27 00101/00002 0x100 (g729) No Rx: ACK
:).
In this case, a client which my company manages wanted to minimize bandwidth usage from VoIP phones traveling through a VPN. Both the G729 & G723 codec are freely available from here, though you can alawys purchase a copy from Digium.
First download the G729 codec appropriate for your processor & system type. A great way to find this information is to run a cat /proc/cpuinfo and a uname -m command. Search down through the list (ensure you download G729, not G723!) for your appropriate binary. In my case, we were running on a P4 with no ss3, so I stuck with the standard codec_g729ast14-gcc4-glibc-pentium4.so binary.
Now, I'm not sure if this is necessary, but I moved the /usr/lib/asterisk/modules/format_g729.so file out of the /usr/lib/asterisk/modules folder, over to /home/root. I did this to ensure we were starting fresh.
Next, copy the downloaded codec over to that same /usr/asterisk/modules folder. Connect into asterisk console with the command asterisk -r, and load the new codec with module load codec_g729-ast14-gcc4-glibc-pentium4.so, or whatever your codec was.
You would think the phone system would be ready for G729 use, but in my case, I needed to restart asterisk with the command restart gracefully. Ensure everyone is out of the office, as this will drop all live calls!
When asterisk comes back up, log back into asterisk and run the command show translation which should give you some output such as the following:

As long as there’s a # (in this case, 6’s) and not a – under the g729 codec, we know it’s working properly.
The next step would be to head into the web interface, under PBX->PBX Settings->Extensions, choose the extension you wish to enable the codec for, ensure disallow is set to “all” and allow is set to “g729”.


Once the extension is set up to allow g729, you can test whether it’s working properly by having a test call connected and running the command sip show channels:
trixbox1*CLI> sip show channels
Peer User/ANR Call ID Seq (Tx/Rx) Format Hold Last Message
10.100.253.91 4004 2e1225e1-27 00101/00002 0x100 (g729) No Rx: ACK
:).
Monday, September 7, 2009
Sharing LAN/Internet Connection to 2nd NIC
I bought a PS3 several months ago, and wanted to try streaming movies to the PS3 using something like Mediatomb or PS3 Media Server (my personal favorite).
My first attempted involved transcoding & wireless..the combination resulted in endless lag & choppiness, that essentially made the movie unplayable. To resolve the issue, I decided to install a secondary NIC into my PC, to share the connection from the first NIC. This way, I could not only stream movies from my PC directly to the PS3 via crossover cable, I could also access the internet as well.
To begin, ensure that your NIC has been properly installed in your kernel. A quick lspci should do the trick:
00:00.0 Host bridge: VIA Technologies, Inc. VT8366/A/7 [Apollo KT266/A/333]
00:01.0 PCI bridge: VIA Technologies, Inc. VT8366/A/7 [Apollo KT266/A/333 AGP]
00:09.0 Multimedia audio controller: C-Media Electronics Inc CM8738 (rev 10)
00:0a.0 Ethernet controller: ADMtek NC100 Network Everywhere Fast Ethernet 10/100 (rev 11)
00:10.0 USB Controller: VIA Technologies, Inc. VT82xxxxx UHCI USB 1.1 Controller (rev 80)
00:10.1 USB Controller: VIA Technologies, Inc. VT82xxxxx UHCI USB 1.1 Controller (rev 80)
Boom. Now let's proceed to ensuring that IPv4 forwarding is enabled. In Slackware 12.2, we can ensure this forwarding is enabled at boot time by by navigating over to /etc/rc.d/ & checking that the file rc.ip_forward has the execute permission (it's green when we type ls, if your bash is using colors). If not, we run the command su -c "chmod +x rc.ip_forward", then the command /etc/rc.d/rc.ip_forward start -- the final result should be as following: Activating IPv4 packet forwarding.
Next, I set a static IP on the secondary NIC as 192.168.2.2. My other NIC (and router) are on the 192.168.1.1 subnet. Here's a quick view of my topology:
|Router|
192.168.1.1
|
192.168.1.33 (eth1)
|PC|
192.168.2.1 (eth0)
|PS3|
192.168.2.1
As you can see the secondary NIC & PS3 are on a completely different subnet. This is to avoid having to add a route on my router to route packets to the PS3.
My NIC configuration on the PC's secondary NIC is set as following, in my /etc/rc.d/rc.inet1.conf:
# Config information for eth0: (connected to the PS3)
IPADDR[0]="192.168.2.1"
NETMASK[0]="255.255.255.0"
USE_DHCP[0]=""
DHCP_HOSTNAME[0]=""
# Config information for eth1: (connected to the LAN)
IPADDR[1]="192.168.1.133"
NETMASK[1]="255.255.255.0"
USE_DHCP[1]=""
DHCP_HOSTNAME[1]=""
Once you save the configuration, restart your internet services with the command /etc/rc.d/rc.inet1 restart -- your NIC's should now hold the proper IP addresses.
Now our next step will be to create a new start-up script in /etc/rc.d to properly forward traffic between the two NIC's. My file is named /etc/rc.d/rc.ps3 (appropriate, huh ;]), and contains the following:
#!/bin/sh
echo "Starting PS3 services..."
/usr/sbin/iptables -F
/usr/sbin/iptables -t nat -F
/usr/sbin/iptables -t mangle -F
/usr/sbin/iptables -t nat -A POSTROUTING -o eth1 -j MASQUERADE
/usr/sbin/iptables -A FORWARD -i eth0 -j ACCEPT
echo "PS3 crossover forwarding enabled."
In this example, my external NIC (facing the LAN/internet) is eth1, while the NIC connected to the PS3 via crossover is eth0.
Save the file, and set the execute bit with chmod +x rc.ps3 ....
Have fun streaming & surfing!
Tuesday, September 1, 2009
/proc/misc: No entry for device-mapper found Is device-mapper driver missing from kernel?
This is a bit of an irritating error, with a simple solution:
/proc/misc: No entry for device-mapper found
Is device-mapper driver missing from kernel?
Failure to communicate with kernel device-mapper driver.
Added Linux *
First of all, we need to make sure that our kernel configuration has Device Drivers->Multiple devices driver support (RAID and LVM) compiled in, with Device Mapper Support as a module.
Once device mapper support is compiled in as a module, if we still receive the error, we can run:
sudo modprobe dm_mod
sudo /sbin/lilo
The errors should now be gone:
Added Linux *
Sunday, August 30, 2009
Compiz Fusion + Xfce 4.6 + Slackware 12.2 + NVIDIA
This one should be relatively easy for people, but I'd just like to document the steps taken anyway--I had a bit of a time getting Compiz to start properly in Xfce. Please note these are not best practices & are simply the steps to get compiz working for me.
First of all, navigate your browser over to: http://www.slackbuilds.org & run a search for "compiz," under version 12.2. Your first result will be the "compiz-bcop" slackbuild. Select it, which will show you a quick description of the package, and the suggested build order of all compiz packages:
Suggested build order:
1. compiz-bcop
2. libcompizconfig
3. compizconfig-backend-kconfig (optional)
4. compizconfig-backend-gconf (optional)
5. compizconfig-python
6. ccsm
7. simple-ccsm (optional)
8. compiz-fusion-plugins-main
9. compiz-fusion-plugins-extra (optional)
10. compiz-fusion-plugins-unsupported (optional)
11. emerald (optional)
12. emerald-themes (optional)
13. fusion-icon (optional)
Now, download it. If you're unfamiliar with SlackBuilds, they're actually quite simple:
Now, being my guide is for NVIDIA video cards, I'm unable to give much direction on other cards. To set up your card, head over to the Compiz Fusion Wiki: http://wiki.compiz-fusion.org/Hardware/NVIDIA and follow the steps for your appropriate driver version.
My /etc/X11/xorg.conf file's "Screen" section ended up look as such to get my extremely outdated GeForce MX 440 working:
# Allows GLX to work with composite.
Option "AllowGLXWithComposite" "True"
# Improves performance, enabled by default on driver versions >=1.0-9746
Option "RenderAccel" "True"
# Always force Hsync & Vsync regardless of the mode.
Option "UseFBDev" "True"
# I believe this was necessary to get window borders working as well. Please correct me if wrong.
Option "AddARGBVisuals" "True"
# Improves performance. Currently incompatible with SLI and MultiGPU modes. As of nvidia driver version 100.14.09, it has been enabled by default.
Option "DamageEvents" "True"
# Use the following option with caution as it may not work on all systems.
Option "UseEvents" "False"
# Use the following option with caution as it may not work on all systems, especially with 6 series GeForce cards (it is known to cause freezes with compiz) but give it a try because it helps performance. It can also break Xinerama.
Option "BackingStore" "True"
# Necessary to make window borders visible with nvidia driver versions prior to 100.xx.
Option "AddARGBGLXVisuals" "True"
NOTE: This will more than likely be different for your card, but these options work well with GeForce MX 440's :).
The next step will be to configure nvidia-settings to load your configuration at Xfce's start. To do this, I wrote a very simple bash script:
#! /bin/bash
# Simple script to load NVIDIA settings on Xfce start.
nvidia-settings --load-config-only
Save this to ~/.init_nvidia, make make the file executable with the command: chmod +x ~/.init_nvidia and add it to your Xfce Settings->Sessions & Startup->Application Autostart tab.
Next time your restart your Xfce session, your NVIDIA settings will be loaded by default.
The next step is where I got tricked up, and want to document for anyone else who might be having issues. I attempted running the command compiz --replace to replace xfwm4 with compiz, but it seemed as if the two were litterally fighting over managing my windows, getting stuck in an endless loop of switching back & forth between themselves. After tinkering with this issue for hours, I found the simplest solution to RTFM. I found the solution on (ha) Arch Linux's Wiki (http://wiki.archlinux.org/index.php/Compiz --using fusion icon, method 2). The steps are very simple, but only work for the current user:
Edit ~/.config/xfce4-session/xfce4-session.rc and add the following to the bottom of the file:
Client0_Command=fusion-icon
Comment out Client0_Command=xfwm4 if it exists.
This should cause compiz to be loaded instead of xfwm4,
though this didn't seem to work properly without a few extra steps.
To prevent the default session from being overwritten add or change
the [General] section to:
[General]
AutoSave=false
SaveOnExit=false
Now save the file.
Back in Xfce Settings->Sessions and Startup->Application Autostart->Add a startup entry for the command fusion-icon
Close Xfce & remove all current sessions with rm -rf ~/.cache/sessions
Have fun :).
First of all, navigate your browser over to: http://www.slackbuilds.org & run a search for "compiz," under version 12.2. Your first result will be the "compiz-bcop" slackbuild. Select it, which will show you a quick description of the package, and the suggested build order of all compiz packages:
Suggested build order:
1. compiz-bcop
2. libcompizconfig
3. compizconfig-backend-kconfig (optional)
4. compizconfig-backend-gconf (optional)
5. compizconfig-python
6. ccsm
7. simple-ccsm (optional)
8. compiz-fusion-plugins-main
9. compiz-fusion-plugins-extra (optional)
10. compiz-fusion-plugins-unsupported (optional)
11. emerald (optional)
12. emerald-themes (optional)
13. fusion-icon (optional)
Now, download it. If you're unfamiliar with SlackBuilds, they're actually quite simple:
- Find which SlackBuild you'd like to download. In this case, it's the "compiz-bcop" SlackBuild. Please note that SlackBuilds do not contain the application's source, this is a separate download.
- Download "compiz-bcop.tar.gz," "compiz-bcop-0.7.8.tar.gz," (or other appropriate version) and optionally, the "compiz-bcop.tar.gz.asc" file.
- (Optional) If you chose to download the .asc file, you can verify the integrity of your SlackBuild by using the command gpg --verify compiz-bcop.tar.gz.asc
- Extract the SlackBuild with tar -zxvf compiz-bcop.tar.gz
- Move the source file, "compiz-bcop-0.7.8.tar.gz" into the newly extracted compiz-bcop directory, and extract this file too: tar -zxvf compiz-bcop-0.7.8.tar.gz
- Now all that's left to do is to run a quick root command of: su -c "./compiz-bcop.SlackBuild" or sudo ./compiz-bcop.SlackBuild
- You'll get some verbose build & other messages, which ultimately lead to a package created somewhere on your hard drive (in my case, which I believe is the default, the package created is /tmp/compiz-bcop-0.7.8-i486-1_SBo.tgz).
- Run a quick su -c "installpkg /tmp/compiz-bcop-0.7.8-i486-1_SBo.tgz" or sudo installpkg /tmp/compiz-bcop-0.7.8-i486-1_SBo.tgz to install the package.
Now, being my guide is for NVIDIA video cards, I'm unable to give much direction on other cards. To set up your card, head over to the Compiz Fusion Wiki: http://wiki.compiz-fusion.org/Hardware/NVIDIA and follow the steps for your appropriate driver version.
My /etc/X11/xorg.conf file's "Screen" section ended up look as such to get my extremely outdated GeForce MX 440 working:
# Allows GLX to work with composite.
Option "AllowGLXWithComposite" "True"
# Improves performance, enabled by default on driver versions >=1.0-9746
Option "RenderAccel" "True"
# Always force Hsync & Vsync regardless of the mode.
Option "UseFBDev" "True"
# I believe this was necessary to get window borders working as well. Please correct me if wrong.
Option "AddARGBVisuals" "True"
# Improves performance. Currently incompatible with SLI and MultiGPU modes. As of nvidia driver version 100.14.09, it has been enabled by default.
Option "DamageEvents" "True"
# Use the following option with caution as it may not work on all systems.
Option "UseEvents" "False"
# Use the following option with caution as it may not work on all systems, especially with 6 series GeForce cards (it is known to cause freezes with compiz) but give it a try because it helps performance. It can also break Xinerama.
Option "BackingStore" "True"
# Necessary to make window borders visible with nvidia driver versions prior to 100.xx.
Option "AddARGBGLXVisuals" "True"
NOTE: This will more than likely be different for your card, but these options work well with GeForce MX 440's :).
The next step will be to configure nvidia-settings to load your configuration at Xfce's start. To do this, I wrote a very simple bash script:
#! /bin/bash
# Simple script to load NVIDIA settings on Xfce start.
nvidia-settings --load-config-only
Save this to ~/.init_nvidia, make make the file executable with the command: chmod +x ~/.init_nvidia and add it to your Xfce Settings->Sessions & Startup->Application Autostart tab.
Next time your restart your Xfce session, your NVIDIA settings will be loaded by default.
The next step is where I got tricked up, and want to document for anyone else who might be having issues. I attempted running the command compiz --replace to replace xfwm4 with compiz, but it seemed as if the two were litterally fighting over managing my windows, getting stuck in an endless loop of switching back & forth between themselves. After tinkering with this issue for hours, I found the simplest solution to RTFM. I found the solution on (ha) Arch Linux's Wiki (http://wiki.archlinux.org/index.php/Compiz --using fusion icon, method 2). The steps are very simple, but only work for the current user:
Edit ~/.config/xfce4-session/xfce4-session.rc and add the following to the bottom of the file:
Client0_Command=fusion-icon
Comment out Client0_Command=xfwm4 if it exists.
This should cause compiz to be loaded instead of xfwm4,
though this didn't seem to work properly without a few extra steps.
To prevent the default session from being overwritten add or change
the [General] section to:
[General]
AutoSave=false
SaveOnExit=false
Now save the file.
Back in Xfce Settings->Sessions and Startup->Application Autostart->Add a startup entry for the command fusion-icon
Close Xfce & remove all current sessions with rm -rf ~/.cache/sessions
Have fun :).
Subscribe to:
Posts (Atom)